Curiota Documentation
Installation
Curiota is available for free from the Apple Mac App Store:
The Mac App Store app will take care of downloading and installing Curiota, and keeping up with future updates.
Setup
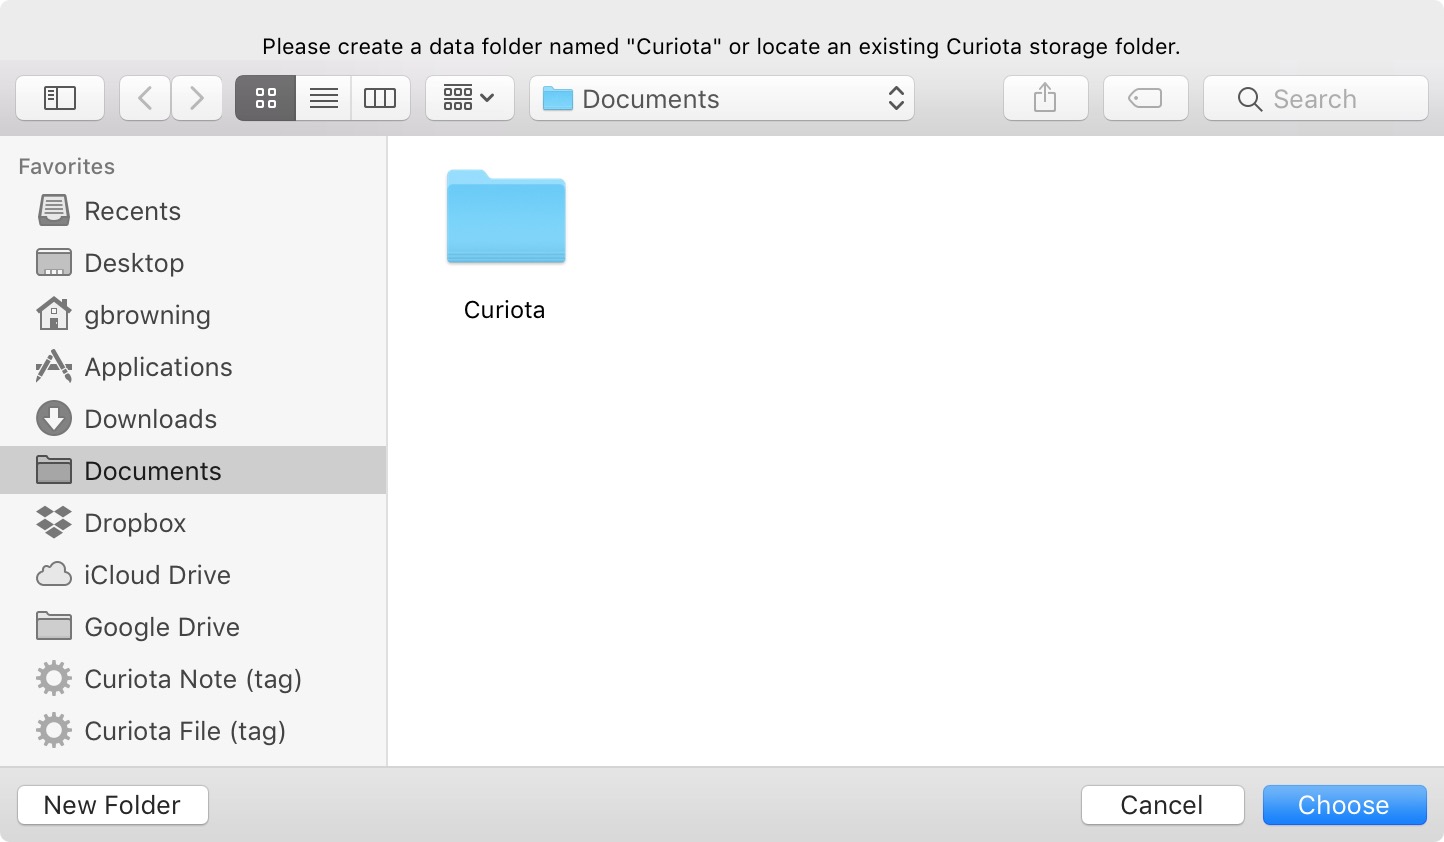
Curiota needs a folder to store all the notes and files you collect.
On first launch, Curiota will ask you to either create a new folder named "Curiota", or choose an existing folder named "Curiota".
This folder must be named "Curiota" but it can be located anywhere on your Mac, including within a synced folder such as Dropbox or iCloud Drive.
Note that this folder must be accessible by Spotlight as Curiota uses those services to find notes and files. That is, make sure it isn’t hidden from Spotlight via System Preferences > Spotlight > Privacy.
Automatically Launch at Login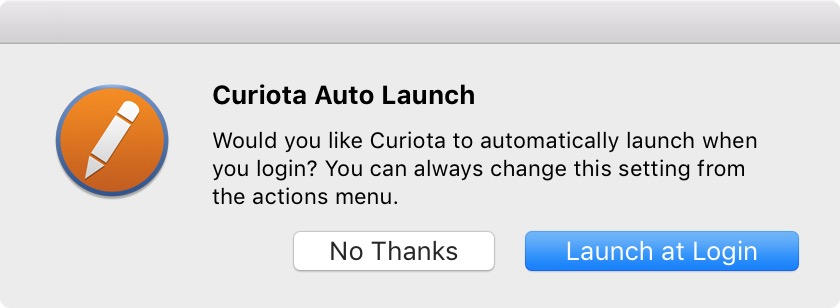
Curiota will then ask you if you want it to automatically launch itself when you login so it’s always ready for you. This can be also configured through its Preferences, as described below.
That’s It!
Curiota’s litte icon up in the menu bar area (![]() ) is now ready and available!
If you have any issues then check out the Troubleshooting section below.
) is now ready and available!
If you have any issues then check out the Troubleshooting section below.
The Curiota Library
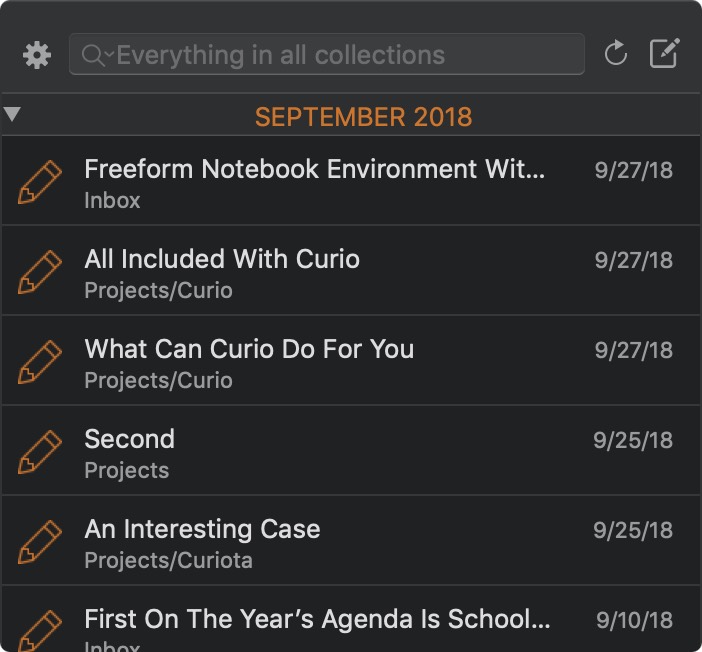
Click the Curiota icon ![]() in the top-right area of the menu bar to see a Library display showing your collected items like this:
in the top-right area of the menu bar to see a Library display showing your collected items like this:
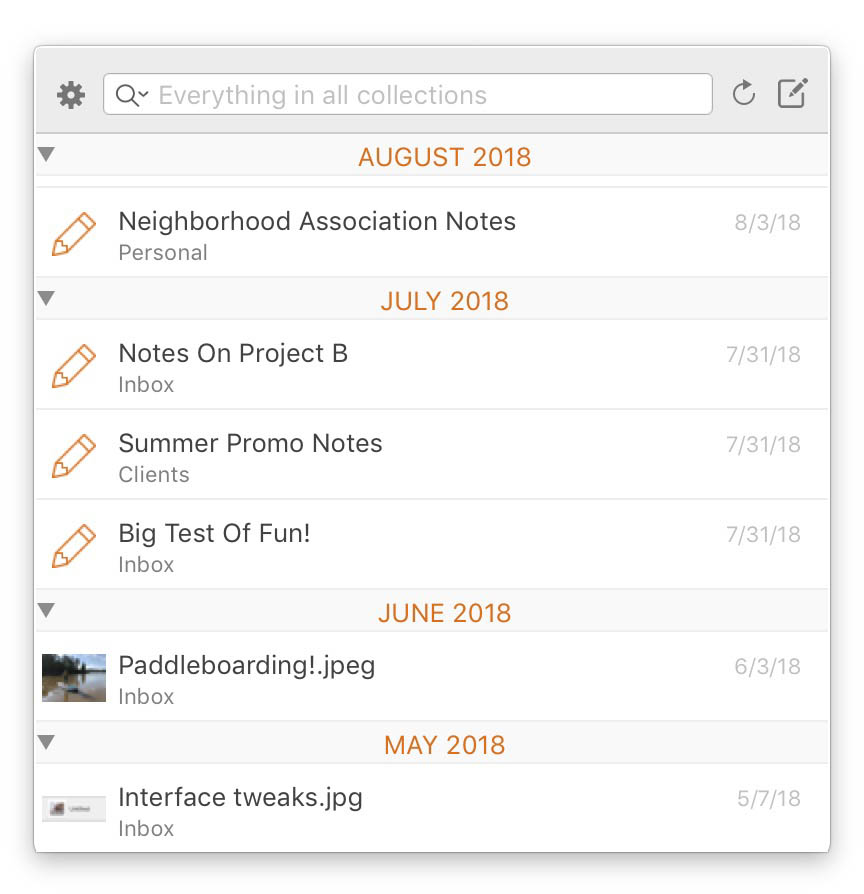
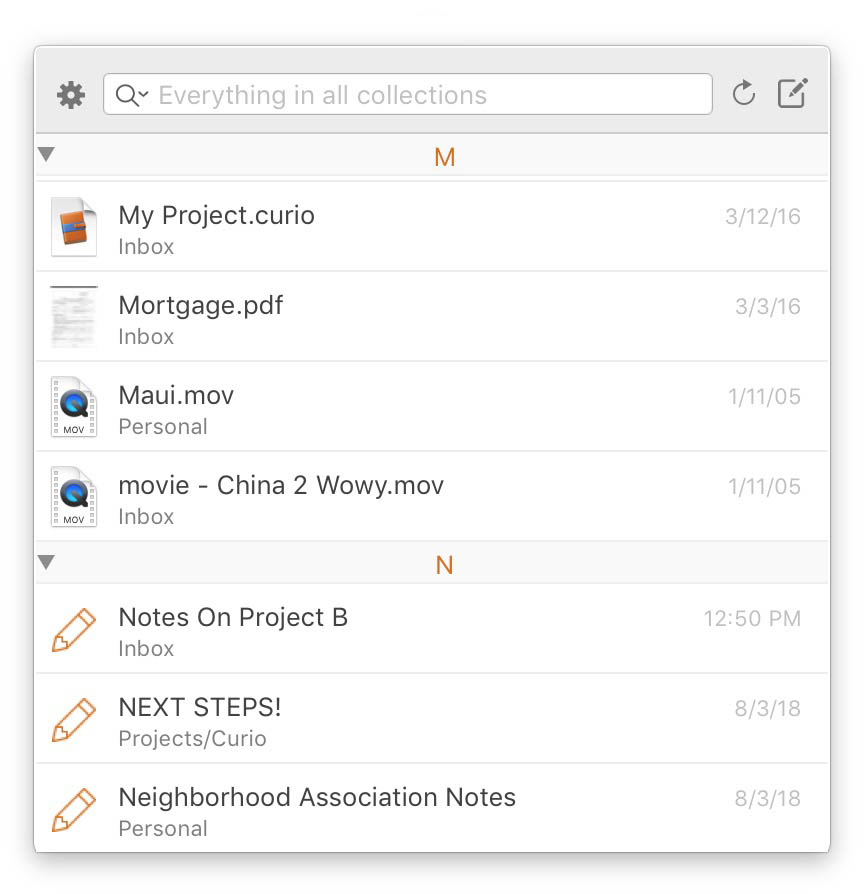
At the top of the Library you’ll find a simple toolbar:
- The actions popup menu button

- The search field, which also displays the current filtering criteria

- A refresh search results button

- The new note button

Below all of that, the main body of the Library window displays your Curiota contents based on the currently specified filtering criteria.
Dark Mode
If running macOS Mojave (10.14) or greater then Curiota supports the dark mode setting in System Preferences > General.
The Actions Popup Menu 
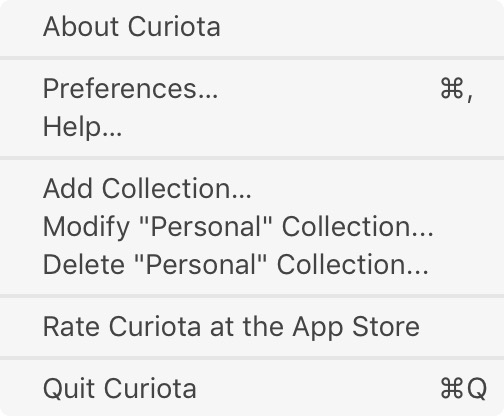 Clicking the actions button will reveal a popup menu where you can view preferences; add, modify, or delete collections; check out the awesome about box; get more help; or quit the application (⌘Q).
Working with Collections
Curiota starts you off with a default collection, Inbox, but you can create your own such as Personal and Work to help you keep your notes and files organized.
Adding a Collection
Specify a name for your new collection and an optional color, so your personal collection titles will really stand out.
If you select an existing collection in the popup then your new collection will be created as a child of this parent collection. This allows you to create hierarchies such as Clients/On Hold. Then, in the Library, you can find all Clients items, recursively, or only those in the On Hold child collection.
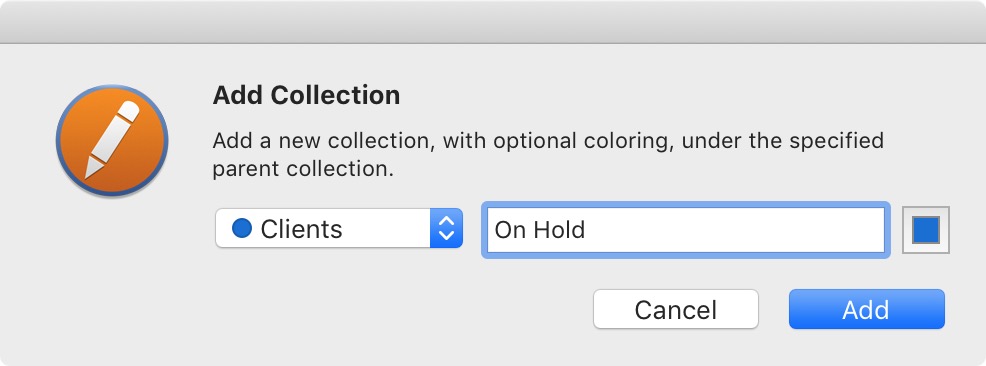
When you select a parent collection, the color for the new collection is refreshed so it is set to the parent’s coloring by default. A collection color is only recorded if you change it to something other than that default, allowing the child collection to auto inherit the parent’s color even if you later change the parent’s color.
As a note, to maximize compatibility with various sync services, collection names will be stripped of these characters: /\?%*:|"<>.
Modifying or Deleting a Collection
To modify or delete a collection, first make that the active collection, then those options are available in the actions menu. Note that you cannot modify or delete bundled collections, like Inbox.
If you set the color to the same color as its parent’s color then the stored color is removed so Curiota will auto inherit its parent’s coloring.
The Search Field
Normally the placeholder text of the search field displays the current filtering criteria, like this: ![]() .
.
You can enter a search phrase (press ⌘F to jump to the search field) to add text terms to the existing filtering criteria:
- Type any phrase to search file contents and titles for that phrase: collaboration.
- Prefix the search criteria with a ' (single quote) and only titles will be searched, not content 'curiota.
- Prefix the search criteria with a . (period) and only file extensions will be searched: .pdf.
- Use commas to add additional criteria which will be and'ed together: collaboration, 'curiota, .pdf.
Therefore, searching for collaboration, 'curiota, .pdf will find all matches that have the word collaboration in the content or title, and the word curiota in the title, and have a file extension of .pdf.
Filtering and Sorting
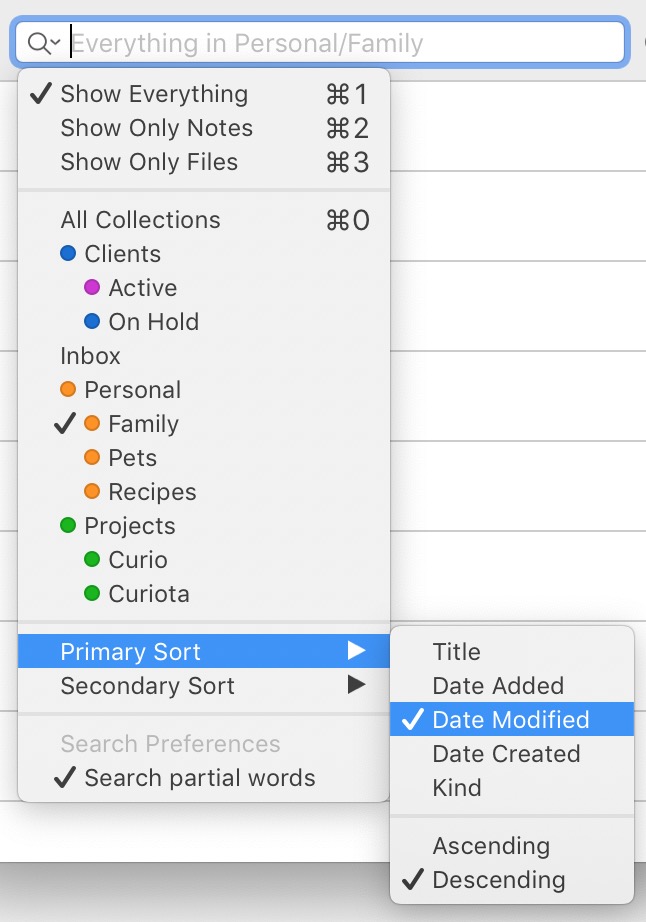
If you click the magnifying glass in the search field you can change your filtering and sorting options:
- Whether you see everything, only notes, or only files,
- In all collections or just a specific collection (and its children),
- Sorted by title, date added, date modified, date created, or kind (in ascending or descending order),
- With a secondary sort using the same criteria choices,
- And any extra options like only searching for partial word matches (searching for "mac" will also find "macs" and "macintosh" but not "iMac").
As you change the filtering criteria the results will refresh and the search field placeholder text will change to reflect the new criteria.
Sorting by Kind
The ability to sort by kind is only available if showing either Everything or Only Files. This will group files into general categories such as Curiota Notes, Movies, Audio, PDF Documents, Images, Documents, etc.
Refreshing the Results 
While the Curiota window is up, Curiota’s Spotlight query for results is quietly running in the background which means the results should refresh themselves automatically.
However, you can also force a refresh if you wish by clicking ![]() or pressing ⌘R.
or pressing ⌘R.
Adding a New Note 
Click ![]() or press ⌘N to add a new note.
This new new note will be created in the active collection within the library, else the Inbox collection if currently viewing All Collections, but you can always change that location in the note editor.
or press ⌘N to add a new note.
This new new note will be created in the active collection within the library, else the Inbox collection if currently viewing All Collections, but you can always change that location in the note editor.
Adding a New Note using an Existing Note as a Template
 You can also create a brand new note using an existing note as a template.
Simply right-click on a note in the library, then choose New Note With Selected As Template.
A duplicate of the note will be added to your library, with a modified title to indicate it’s a copy, and you will begin editing this new note.
The Library Results
The main content area of the Library shows the results of your search criteria, where you can:
Double-click an item to open it
- Notes will be opened with Curiota’s integrated note editor.
- Files will be opened using the appropriate default app.
Right-click on one more more selected items to
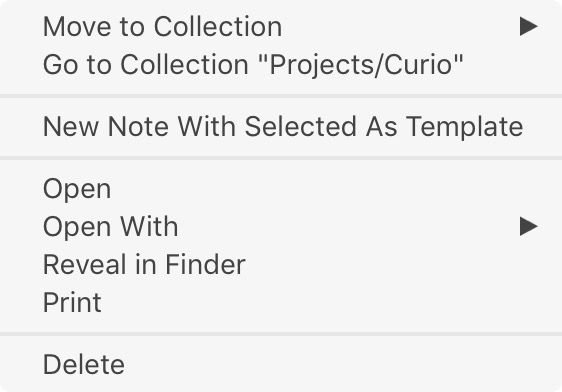
- Move the items to another collection.
- Go the selected item’s collection.
- Rename a single selected file. If you delete the extension it will be automatically appended. Notes cannot be renamed using this method as a note’s file name is based on its title, so you have to edit its title in the Curiota note editor, instead.
- Create a new note using the selected note as a template.
- Open the items using the Finder. For notes, since they are stored as RTF or RTFD documents, this can open the note in TextEdit.
- Open the items with a specific app.
- Reveal the items in the Finder.
- Open and immediately print the items using the appropriate default apps, then quit those apps.
- Delete the items, which sends them to the Trash.
- Convert one or more selected text files into Curiota notes.
Right-click on one of the group headings to
- Expand or collapse all groupings.

Press a key
- Press
DeleteorBackspaceto send the selected items to the Trash. - Press
Spacebarto show the Quick Look preview for the selected items. - Press
Returnto edit the title of a selected file, or if a note is selected, open the note using Curiota’s integrated note editor. - Press
⌘Returnto open the selected items using the Finder. - Press ⌃⇧→ to edit the selected note then, once in the note editor, you can press ⌃⇧← or
Escapeto come back to the library. - Press ⌃⌥→ to change the active collection to the selected item’s collection.
- Press ⌃⌥← or ⌘↑ to change the active collection to the parent of the current collection.
Drag a selection of items from the Library to
- The Desktop, Finder, or elsewhere to copy the selected files to that location.
Drag files and images from outside of Curiota into the Library
- If a specific collection is selected then the dropped items are added to that collection.
- Otherwise if All Collections is selected, the dropped items are added to your Inbox collection.
- Files are moved or copied in the same manner as drag-and-dropping to the Curiota menu icon as detailed below.
The Note Editor
Creating a New Note
Click ![]() in the Library or press ⌘N to add a new note.
in the Library or press ⌘N to add a new note.
The note will be created in the collection determined by:
- If you’re currently viewing the Library then the new note is added to the displayed collection, or the Inbox collection if displaying All Collections.
- If you’re currently viewing or editing an existing note then the new note will be created in the same collection.
You can always change that location using the note editor’s collection popup.
Using the Note Editor
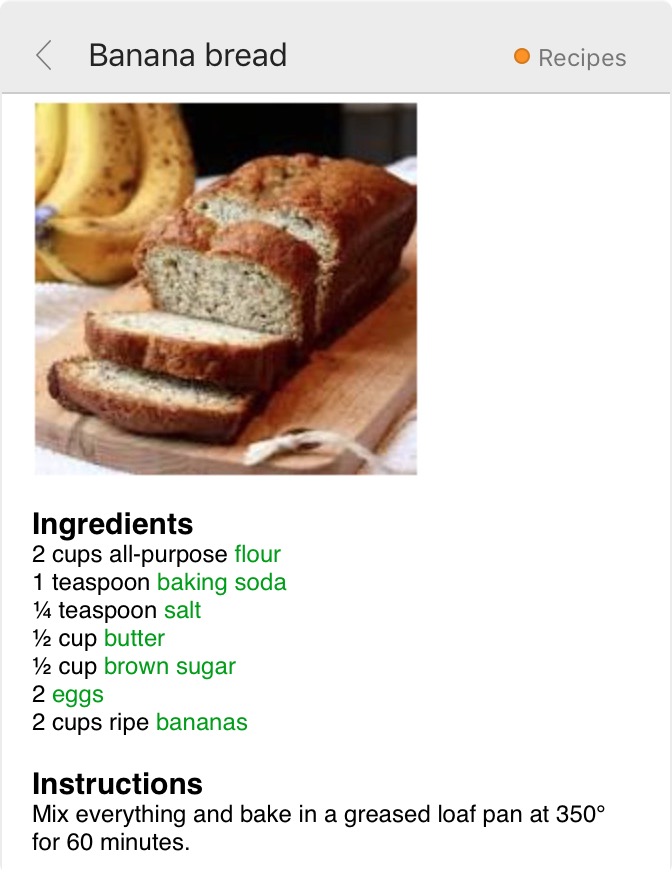
Notes are very simple: a title field and a note area.
The title is optional; you can enter one if you wish. Otherwise, the Library will simply display the first few words within the note’s body.
The notes themselves are rich text which means fonts, colors, hyperlinks, and images are all supported.
The standard keyboard shortcuts all work, such as:
- ⌘B for bold
- ⌘I for italics
- ⌘U for underline
- ⌘K to make a link
- ⌘T for the standard Font chooser
- ⇧⌘C for the standard Color chooser
- ⌘- to decrease the font size
- ⌘= to increase the font size
Plus standard text editing feature like smart quotes, smart links, and smart dashes are enabled by default, although you can use the right-click context menu to disable.
You can drag or paste text, images, and links from outside of Curiota directly into a note.
Saving a Note
Curiota will automatically save the note, and the selected text range and cursor position, when you close the window or go back to the library. The underlying file name for the note, which is displayed in the library, will use the specified title, if it exists, or the first few words of the note content. The note’s file format will be either standard RTF or RTFD (if the note contains images).
Changing the Note’s Collection
Your note will be stored in the collection indicated in the popup at the top of the window. If you wish to save the note in a different collection, simply choose a different collection and Curiota will move the note. See above for more details on adding and modifying collections.
Finding within a Note
Press ⌘F to find text within a note using the standard find bar. You can use the buttons on the find bar to find the next (⌘G) or previous (⇧⌘G) found instance. The find bar also supports selectively replacing found text with new text.
Closing the Note Window
Press ⌘W to close the note window. Changes to your current note will be automatically saved first, if necessary.
Adding another New Note
While editing the current note, you can press ⌘N to start a new note in the current collection. Changes to your current note will be automatically saved first, if necessary.
Navigating Through Notes
If the active note is in the current Library results list then you can hold ⌘ while swiping left or right to move to the previous or next note in the Library. Changes to your current note will be automatically saved before navigating away, if necessary.
Working with Plain Text Notes
By default Curiota supports rich text (rtf, rtfd) documents for its notes.
However, you can also create a Curiota note and give it a title which includes a plain text extension, like Class Notes.md or Snippets.m or Vacation.txt, etc.
The resulting note file will have that same specified name. Curiota will recognize that this is a plain text note and configure its editor accordingly (no fonts, colors, bold, etc).
You can rename the file via the note editor's title field.
You can Option-drag these note files from Curiota's Library directly into Curio Pro (or use Curio's Local library shelf) to create a synced file-backed text figure so that changes made in either app will sync to the other!
Syncing Notes with 3rd Party Apps
Using a 3rd party app, you can directly save text files into the Curiota data storage folder's (Notes) subfolder file hierarchy.
Curiota will treat those files as plain text notes, allowing you to edit and rename them within the Curiota notes editor, while still allowing you to edit the files directly using your 3rd party app.
If your Curiota data storage folder is synced via a service like iCloud or Dropbox then that means you can use an iOS app, like Drafts for iOS, to create plain text or markdown text notes and save them to that synced (Notes) subfolder.
This means you could use a mix of Curiota and other macOS and iOS apps to directly edit the same synced note. And, as mentioned above, if you Option-drag these note files from Curiota's Library directly into Curio Pro you can create a synced file-backed text figure so that changes made in Curio, Curiota, or your 3rd party apps will all sync with each other!
Going Back to the Library
There are several ways to go back to the library:
- Click on the
 button at the top of the window.
 - Press
Escape. - Use a left-swipe gesture (2-finger swipe with mouse, 3-finger swipe with trackpad).
Notes View Context Menu
If you right-click on the note content area you can see the notes editor context menu.
Text Settings
If you right-click on the note content area, you can toggle smart copy/paste, smart quotes, smart dashes, smart links, data detectors, text replacement, spell checking, grammar checking, and automatic correct spelling, and these settings are stored to your global preferences and will be restored when you view future notes.
Text Clean Up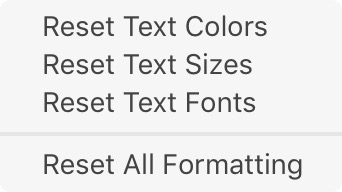
Curiota can perform clean up of your note content by resetting text colors, sizes, fonts, or even resetting all formatting. This can come in handy when pasting content from web browsers or other sources.
Force White Background
If in dark mode, Curiota will automatically tweak font or text background colors are that either very dark or very light so they’ll work correctly in a dark mode note editor window. Alternatively, you can tell Curiota to always use a standard white background to maximize compatibility with notes containing a mix of text colorings.
Windows Management
Detaching the Window
You can detach the Curiota window from its menu bar icon by dragging near the top of its window and pulling it away from the menu bar. It will turn into a free-floating window that you can place anywhere and resize to any size.
Curiota will save this window position and size and restore it when relaunched.
Attaching the Window
If you would like to re-attach the Curiota window to its menu bar icon then you can either:
- Double-click on the top background area of the detached window.
- Drag the detached window to the Curiota menu bar icon and when you release it will snap under the icon and re-attach.
Window Visibility
The Curiota window can remain visible even when you switch to another application so you can refer to your notes and for easier note-taking and image gathering. Curiota can also optionally force its window to appear on top of other windows, if you wish. These settings can be customized in Preferences or by right-clicking the top area of Curiota’s window.
Resizing the Window
When attached to its menu bar icon then you can resize the window but Curiota will constrain the resize to make sure it remains under its icon. If Curiota is a detached, floating window then you can resize it freely.
Hold the ⌥ (Option) key down while resizing to resize the width bidirectionally.
Closing the Window
You can click the Curiota menu icon, or press ⌘W or Escape to close the Curiota window.
Quitting Curiota
You can quit Curiota by choosing the Quit menu item in the actions menu, or just press ⌘Q.
Switching to Curiota via Keystroke
Curiota doesn’t have a dock icon so you can't ⌘Tab to it. However, you can set up a global shortcut in Preferences to activate Curiota.
If you press this shortcut while in another application then Curiota is made active and its previous view (either the Library or the note being edited) is displayed. If you press this shortcut while within Curiota then you will switch back to your previous application.
Dragging in Files, Images, and Text
Dragging to the Menu Bar Icon
You can drag files, images, and text directly to the Curiota menu bar icon to instantly add them to the current Curiota collection. This operation works even if the Curiota window itself is not open.
- Files dragged in from the Finder or another application will be copied into Curiota by default, or you can hold the ⌥ (Option) key while dragging to move files into Curiota, thus removing them from their original location.
- An image dragged in from your web browser or another application will be added as a new Curiota image file.
- A web link dragged in from your web browser’s location bar will be added as a new Curiota webloc file.
- Selected text (plain text, rich text, or rich text with images) dragged in from your web browser or another application will be added as a new Curiota note. If the text came from a browser, and the originating URL can also be found on the clipboard, then an attribution line is appended to the dragged-in text, so you can get back to the original source. Curiota will then bring up the new note in its editor so you can verify or tweak its contents.
While dragging over the menu icon the icon color will change so you know Curiota is going to accept your drop.
The default collection for items dragged to the Curiota icon is the same as the Library’s current collection, or the Inbox collection if the Library is currently displaying All Collections.
Alternatively you can tell Curiota to always place dropped items into the Inbox collection, regardless of which collection is currently active, using this option.
Dragging to the Library
As mentioned above, you can also drag to the Curiota Library window. If a specific collection is currently being viewed then the dropped items are added to that collection otherwise, if All Collections is selected, they’re added to your Inbox collection.
Importing Text Files as Curiota Notes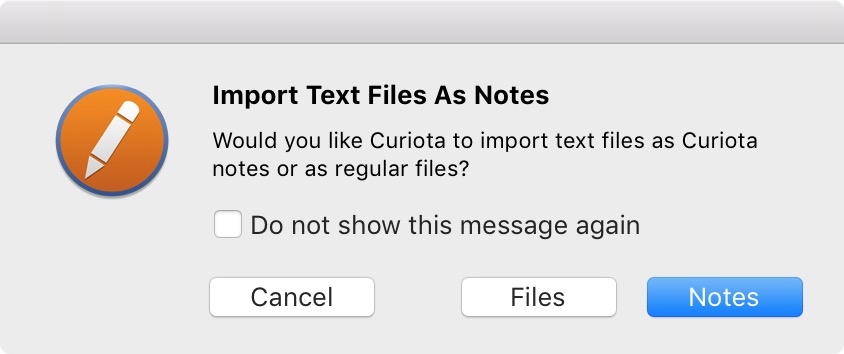
If one or more of the dragged-in files are text files (files with an rtf, rtfd, or text extension) then Curiota will ask if they should be converted into Curiota notes automatically or simply brought in as regular files.
On a related note, at any time you can right-click on a file in the library and choose to convert it into a Curiota note if you wish.
Support for Aliases
Technically you can create an alias to a file by dragging in a file while holding down the ⌘ key. However, aliases are discouraged since, due to sandboxing restrictions, Curiota has pretty limited access to aliases: it cannot search into its contents, open it, print it, or even display a Quick Look thumbnail or preview. More technical details regarding aliases can be found below.
Customizing Curiota

Curiota has a preferences window accessible via its actions menu (or via ⌘-Comma) where you can change a number of settings.
- Curiota Storage Folder
If you wish to to see the current location of your Curiota storage folder or switch between multiple Curiota storage folders then you can do so here. However, if you wish to move your Curiota storage folder first quit Curiota, move the folder using the Finder, then re-launch Curiota and you will be asked to re-locate its new location automatically. - Launch At Login
You can specify whether Curiota launches itself automatically at login so it’s ready to go. - Keyboard Shortcuts
Specify a global keyboard shortcut that will bring up Curiota when you’re in another application: the last-displayed Library or Notes view appears (either in the attached popover or in the detached floating window if it’s up). If you press the shortcut within Curiota, then you’ll switch back to your previously active app. You can also set a global shortcut to instantly create a new note. - Default Note Font
Specify the default font and font size to use when creating new notes. - When switching to another app keep Curiota visible /on top
When checked, Curiota will stay visible even when you switch to another app. And, if visible, you can also specify that Curiota’s window remains on top of other app windows. You can also change this setting by right-clicking the top area of Curiota’s window.
Curiota Integrations
There are lots of ways to work with Curiota.
macOS Services Support
Curiota adds two items to the system-wide Services menu to help you bring content into Curiota:
- Add File to Curiota — this service option is available when you select a file in the Finder,
- Add Text as Curiota Note — this service option is available when you select a region of text in any application.
These service options can be enabled and given global keyboard shortcuts via System Preferences > Keyboard > Shortcuts.
macOS Share Button Support 
Curiota supports the standard macOS Share button found in many app toolbars so you can send data from another application to Curiota with just a click.
When sharing selected text, like from Safari or Notes, you will see an entry for where you can optionally enter a title which will be used as the note title.
If you enter a title with a valid plain text extension, like Notes.md, then the resulting note will be formatted as plain text and stored as a plain text Curiota note.
Web Pages
If you select web content and click Share (or right-click and choose the Share > Curiota menu item) then the text without formatting or images will appear in a share panel for editing before sending to Curiota. An attribution line also appears at the bottom so you can get back to the original source.
Alternatively, what honestly works better than Share is to select a mix of text and images in the browser, click and hold the selected region, then drag it to Curiota menu bar icon, and Curiota will add it as a new note with rich text and inline images.
For specific images on the web page, you can right-click on the image in the browser window and choose the Share > Curiota menu item to instantly bring it into Curiota.
If nothing is selected on the web page when clicking the Share button then the page's URL will appear in a share panel for editing or annotating before sending to Curiota.
Apple Notes
You can Share a note from Notes to Curiota although there are some quirks.
If nothing is selected the entire note will appear in a share panel for editing when Share is clicked. However, images or other embedded file content are simply appended as attachments to the end of the text, instead of inline within the text. Also, any images in the note that are from Retina display snapshots appear as doubled-in-size images, almost like they lost their Retina DPI encoding.
If, however, you select a region of text and images in your note then right-click and choose the Share > Curiota menu item, then those Retina images appear to have the correct size, although they are still appended as attachments at the end.
Alternatively, what honestly works better than Share is to select a mix of text and images in the note, click and hold the selected region, then drag it to Curiota menu bar icon, and Curiota will add it as a new note with rich text and with inline images.
Finder
In a Finder window, you can select a file and use the Share toolbar button to send it to Curiota, or right-click on the file and choose the Share > Curiota menu item.
Special URLs
Curiota registers a curiota://command handler with macOS as another means of bringing in information and automating certain tasks.
Open Note
With the open note link syntax you can tell Curiota to open a specific note. For example:
curiota://openNote?path={Personal}/{Recipes}/(Notes)/2018/08/Banana%20Bread.rtfd
You can easily create this link for a given note by right-clicking on the note in the Library and choosing Copy Note Link.
Note this is a relative path within Curiota’s data storage folder so if you later move your folder it can still find it.
However, the link will only work if the note is still within that same collection hierarchy (Personal/Recipes, in this example).
Bookmarklet
Curiota supports a special curiota://importRemoteURL link syntax that can import browser contents, which allows us to create a browser bookmarklet:
javascript:window.location='curiota://importRemoteURL/url='+escape(window.location);
To easily create this bookmarklet, drag this link → Import into Curiota ← directly to your browser’s bookmarks bar.
This bookmarklet will grab the remote content, whether it be a web page or file such as a PDF or image, and bring it into Curiota. If the browser is on a web page then a paginated PDF is generated and stored for that page, and the PDF’s title and author fields are set to the page’s title and URL.
Save PDF to Curiota
Curiota supports a handy Save PDF to Curiota option in the Print dialog, however, due to sandboxing restrictions, this is not enabled by default.
Setup Automatically via Curio
If you happen to have a non-sandboxed version of Curio downloaded from our website, then it will set up this PDF Service automatically when you launch it. However, versions of Curio purchased from the Mac App Store are sandboxed and are unable to set this up for you.
Setup Manually
Fortunately, if you have to set up the PDF Service manually, this is very easy to do. You’ll simply need to create an alias in your PDF Services folder pointing to the Curiota app:
- In the Finder, hold down the ⌥ (Option) key and click the Go menu then choose the Library menu item.
- A new Finder window will appear showing you the contents of the Library folder. Within Library create a new folder titled "PDF Services" if it doesn’t already exist.
- Choose File > New Finder Window to bring up another window and go to your Applications folder.
- Find the Curiota application within the Applications folder and, while holding down the ⌥ (Option) and ⌘ (Command) keys, drag-and-drop the Curiota application to the PDF Services folder in the other Finder window. This will create an alias to Curiota.
- Rename this new Curiota alias to something like "Save PDF to Curiota".
That’s it! The new Save PDF to Curiota option will now appear in standard Print dialogs in the PDF dropdown.
AppleScript/JavaScript Support
Easily add content to Curiota by creating your own scripts! Here are some examples.
Add a Note
tell application "Curiota" add note "Notes for our upcoming trip to London.\n\nDefinitely visit the London Eye.\n" with title "London Vacation" tell application "Curiota add file "/Users/stevej/Downloads/ReadMe.txt" by moving end tell
Add a File
Note that due to sandboxing restrictions, the add file AppleScript action will only work with files coming from your Downloads folder or subfolder.
You can specify a date for an added note or file using the add date clause, which may help if migrating notes/files from a different app or service into Curiota. For example, you can specify
add file "/Users/stevej/Downloads/ReadMe.txt" by moving with date dateToUse add note "A test note from the past." with date date ("6/12/2012")
iOS Mail → Curiota Note
First, paste the following AppleScript code into a new Script Editor document and save it with the file name "Add as Curiota Note" in the ~/Library/Application Scripts/com.apple.mail folder (create that folder if necessary):
using terms from application "Mail" on perform mail action with messages theMessages for rule theRule repeat with theMessage in theMessages set theInfo to return & return & "Received from my iPhone on " & date string of (current date) & " at " & time string of (current date) set theSubject to theMessage's subject set theBody to theMessage's content & theInfo set theTitle to "" if theSubject contains " " then set AppleScript's text item delimiters to space set theTitle to (words 2 thru -1 of theSubject) as string -- get rid of the prefix word set AppleScript's text item delimiters to "" end if tell application "Curiota" add note theBody with title theTitle end tell set the read status of theMessage to true move theMessage to mailbox "Trash" of the account of (mailbox of theMessage) end repeat end perform mail action with messages end using terms from
Next, set up a Mail rule so if (a) the sender is you, and (b) the subject starts with "Note", then execute our special AppleScript file.
The resulting rule in Mail would look like this:
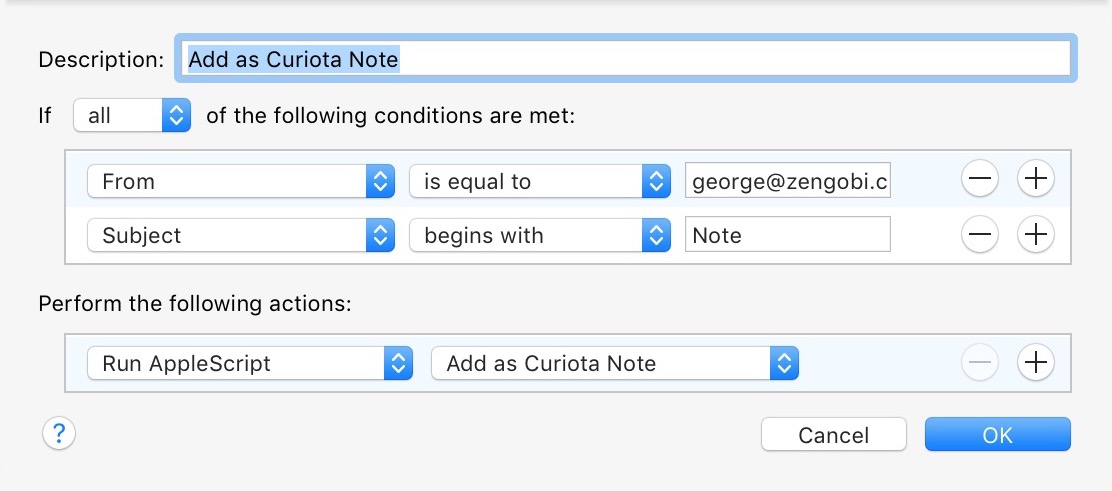
You can then use your iPhone or iPad to send an email note to yourself, it’ll be received by Mail on your Mac, the rule above will execute, and it will be automatically filed as a new note in Curiota, then automatically deleted from your Mail Inbox. Later, when you use Curio, you can use the Local library tab to quickly find all new notes added to Curiota.
You can even do this with Siri on your iPhone or iPad! For example, say "send a mail to myself with the subject note check out rainbow colors". She’ll ask what the message should say and you reply "the rainbow colors would be perfect for that new ad campaign for our new client". The message will be sent and follow the workflow above to land in Curiota.
PopClip
An official PopClip extension for Curiota has been added to their extensions gallery and can be downloaded.
Integrating Curio and Curiota
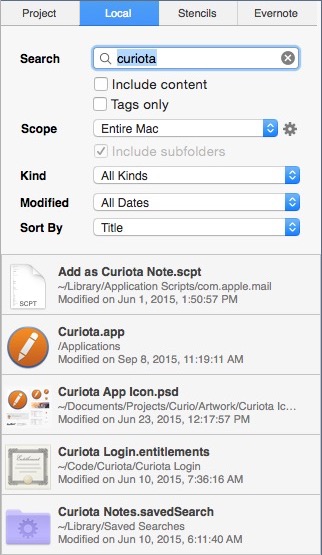
Curiota extends Curio’s functionality via Curio’s Local library shelf.
The Local library uses the power of Spotlight to quickly find files on your hard disk using a number of criteria including text, tags, modification date, and kind of file.
Connecting Curio to Curiota
- Make sure you’ve downloaded and launched Curiota to set up your Curiota data folder.
- In Curio, click the Library toolbar button to see the Library shelf, then the Local tab in that shelf.
- In the Scope popup choose Connect to Curiota and locate your Curiota data folder.
- Your Scope popup will now show your available Curiota collections, including the default Inbox collection which you can choose to see all the notes and files you’ve been adding to Curiota.
If you ever move your Curiota folder you can use the Connect to Curiota option in Scope’s Actions menu.
Old Curio Scrapbook Migration
If upgrading from Curio 9 or older then your old Curio Scrapbook asset library will be automatically converted into a Curiota "Scrapbook" collection.
During the migration, old asset library collections will be mapped to Curiota Scrapbook child collections. For example, if you had an asset associated with "School" then it will be migrated into a new Curiota "Scrapbook/School" collection.
Curio no longer supports Scrapbook related services — printing to Scrapbook, bookmarklets to Scrapbook, or a Services to Scrapbook — as Curiota handles all of this instead.
Internal Architecture
Curiota is made to be open and easily extensible. We’re not going to force you into a proprietary database or software solution. Your data will be safe and accessible for decades.
Flexible Data Storage
You can choose the location where Curiota stores its data. This can be a normal folder, to keep your data local to your machine, or a synced folder, such as a Dropbox folder, for instant access to the same Curiota data storage across all of your Macs and devices.
Switching Storage Folders
You can use the Curiota preferences dialog, explained above, to change to a different Curiota storage folder if you need to keep multiple, distinctly separate storage folders. If you intend to use Curiota in this way, please let us know and perhaps we can implement a faster mechanism for switching between storage folders.
Moving the Storage Folder
You can easily move a Curiota storage folder if you wish. Simply quit Curiota first, move the Curiota folder using the Finder, then re-launch Curiota and you’ll be automatically asked for the folder’s new location. If you use Curio, as well, then you’ll need to tell Curio’s Local library the new Curiota storage folder location using the Scope’s Actions menu.
Open Data Formats
Curiota stores all notes as standard RTF or RTFD (for text with images) files. This means Curiota is compatible with Spotlight searching and you aren’t locked into a proprietary data format or obscure SQLite database. All notes use the standard RTF Title field set to the specified title (or dynamically determined, based on the first few words in the note content), and the RTF Author field set to "Curiota Note" for quick identification and Spotlight querying. Likewise, Curiota notes and files all have a Finder tag set to "Curiota Note" or "Curiota File" for quick identification and Spotlight querying.
Open Directory Structure
An open directory structure allows us plenty of room to expand with future capabilities.
Curiota scans the data storage file hierarchy for notes and files dynamically to build its internal catalog of data. It relies on the files themselves for creation and modification dates. There is no central, ever-growing database that could get corrupted or needs to be synced.
Let’s march down the file hierarchy:
Collections
There are two types of collections:
- Directories created for bundled collections are enclosed with brackets:
[Inbox]and[Scrapbook] - Directories created for user collections are enclosed with braces:
{Personal}and{Work}
For maximum compatibility with various sync services, collection names cannot have any of the following letters: /\?%*:|"<> (more info).
Collections can be nested, so under a {Personal} directory you may have a {Vacations} subdirectory.
Bins
Within each collection directory you’ll find a directory for each data type that Curiota manages which we call a bin.
Bins are enclosed with parentheses: (Notes) and (Files).
Directories within Bins
While directories within bins are not required, Curiota will create year and month directories before storing any data files so all files are neatly organized, file name collisions are unlikely, and the number of files per folder is kept reasonable.
Also, thinking very long-term, it may be handy to have these date subfolders so memory or storage constrained devices can retrieve more recent data quickly, then much older data only as needed, as years from now you could have thousands of files and several gigabytes of data.
Notes
The file name for a note uses the user-specified note title, if it exists, or the first few words of the note content. Any problematic characters are removed: /\?%*:|"<> (more info).
The name is then cased so that "my REALLY cool title" turns into "My REALLY Cool Title". Notice that all-uppercased words are left as-is.
It will have either have an rtf or rtfd extension, the latter if the note contains any images.
If a note with the same file name already exists then an automatic count suffix is applied. In the unlikely event that Curiota can’t determine an appropriate file name for a note then a datetime stamp is used.
Files
Files dragged into Curiota keep their original names where possible otherwise an automatic count suffix is applied.
Aliases
As mentioned above, Curiota can store an alias to a file if you wish. However, due to sandboxing restrictions, there are some important points to consider:
Library Limitations
- Curiota cannot search into the contents of an aliased file, open it, print it, or even display a Quick Look thumbnail or preview.
- However, you can delete the alias, move it to a different collection, or rename it.
- Double-clicking an alias will reveal the resolved file in the Finder so you can open it manually.
Technical Notes
- The resulting alias file that Curiota creates works from the Finder; it is not tied to Curiota.
- If we ever produce a non-sandboxed version of Curiota, then it will be able to open and preview the aliases.
- Other options we explored:
- Using a security-scoped bookmark would allow Curiota to open and preview it but the resulting "alias" file in the Finder would be proprietary and tied to Curiota. It wouldn’t work if you double-clicked it in the Finder, thus defeating the purpose of our open file architecture. They are also slower to resolve and not a good choice for libraries that could contain thousands of files.
- We looked at Unix symbolic links (symlinks) but the resulting link file is ignored by Spotlight thus it won’t appear in Curiota’s library and they don’t resolve correctly if the original is renamed or moved.
Sample Curiota File Hierarchy
Curiota Collections [Inbox] (Files) 2015 05 ReadMe.txt ReadMe 2.txt 06 Contract.pdf (Notes) 2015 05 London Vacation.rtf [Scrapbook] (Files) 2015 05 Project Plan.pages {Personal} {Vacations} (Files) 2015 12 Paris.pages (Notes) 2015 12 Food.rtf (Files) 2015 02 Finances.numbers (Notes) 2014 03 My Great Novel.rtf House Plans.rtfd
Troubleshooting
You can always contact support@zengobi.com or visit the Curiota forums to talk with other Curiota users, but here are some things to check out if you’re having issues getting going:
Curiota Is Empty
- Curiota requires Spotlight to find notes and files so if you don’t see anything, chances are it’s a Spotlight issue.
- Make sure the Curiota folder isn’t being blocked by Spotlight via System Preferences > Spotlight > Privacy. If a folder or disk volume that contains the Curiota folder is in the Privacy list then Curiota will not work.
- If it’s not blocked then let’s do a quick Spotlight test:
- Launch TextEdit, type
findmeplease, and save it as "Spotlight Test" on your Desktop, then quit TextEdit. - Using the Finder, move that file directly into your Curiota storage folder.
- Use Spotlight (⌘-Spacebar) to search for
findmeplease. - If Spotlight doesn’t find it then try these steps:
- Re-index the volume that contains the Curiota directory. This could take a while so be patient while Spotlight churns away. If you click on the Spotlight icon in the menu bar you can check its progress.
- Test Spotlight again by searching for
findmeplease. - If still no luck then, if you’re on a pre-El Capitan release of macOS then use Disk Utility to Repair Disk Permissions. Then re-index and re-search.
- Launch TextEdit, type
Curio Isn’t Displaying Curiota Items
- First, make sure you download, install, and set up Curiota, of course.
- Then, within Curio, click the Library toolbar button then choose the Local tab.
- Click the Scope popup then choose Connect to Curiota and choose the location of your Curiota storage folder.
- You can now choose a Curiota collection, or All Collections, under the Scope popup.
- If that’s still not showing any of your Curiota notes or files then make sure Curiota itself displays items within its interface. See the above troubleshooting topic if necessary.
Advanced Settings
Copy and paste these lines into Applications > Utilities > Terminal to enable special advanced functionality.
Share Auto Markdown Title
If set then the Curiota Share extension will automatically give clippings with no images an Untitled.md file name so it will be stored as a plain text note.
defaults write ~/Library/Group\ Containers/62BXXZ75D4.com.zengobi.curiota/Library/Preferences/62BXXZ75D4.com.zengobi.curiota.plist "Share Auto Markdown Title" -bool yes
Debug Menu
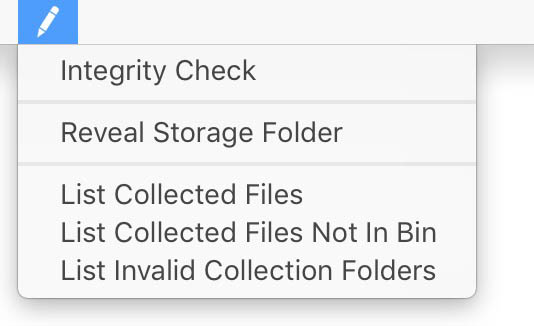
Hold ⌥⌘ and click the Curiota menu bar icon to show the debug menu where you can:
- Integrity Check
An integrity check is performed the first time you click on the Curiota menu bar icon, during a launch session, but you can manually force an integrity check if you wish. - Reveal Storage Folder
Quickly reveal a Finder window disclosing the Curiota storage folder. - List Collected Files
Displays a list of all the collected files found within the Curiota storage folder. This may be handy if you want to verify the organization of the files and notes you’ve been collecting. - List Collected Files Not In Bin
Displays a list of all the files not correctly organized into an internal bin such as(Notes)or(Files), essentially unknown "floaters" within the Curiota file hierarchy. The resulting dialog includes a button you can click to move those files into the nearest collection files bin (else the Inbox) so you can use the Curiota library interface to manually move them into the appropriate collection. All collected files should be in a bin, but if you’ve been adding files directly to the storage folder manually, outside the Curiota interface, then this dialog may be handy. - List Invalid Collection Folders
Displays a list of all the folders that probably should be collections but they don’t have names bounded by curly braces like{Example}that indicate they are collections. The resulting dialog includes a button you can click to fix those folders thus turningProjectinto{Project}.
What’s New
Version 3.5
Updated and modernized codebase for new macOS 12 minimum requirement • Bug fixes.
Version 3.4
True support for plain text notes • Curiota Share extension now supports an optional title field and support for plain text notes • Using the latest MASShortcut as of October 30, 2022 (way up from 2015's 2.3.2 release) for better keyboard shortcut reliability • Support for the Share Auto Markdown Title advanced setting.
Version 3.3
macOS Big Sur support • Now compiled as a universal app for native Apple silicon support • Support for 3rd party note files.
Version 3.2
Notarized and hardened runtime for Catalina • Colored jewels and other tweaks for better dark mode support • You can now set a new note global keyboard shortcut in Preferences • Fixed timing issues with bookmarklet so it's more robust • Lots of Share plugin improvements • Extended attributes (DateAdded, SelectionRange, SourceURL) now set with special flag so they can sync via iCloud • Preferences dialog now shows iCloud folder with more friendly name • Support for curiota://defaults-write preferences setting links.
Version 3.1
Mojave dark mode support • New notes window Clean Up content menu options.
Version 3.0
Major user interface overhaul • Detached window support.
Version 2.6
Additional library and note editor keyboard shortcuts • Debug menu.
Version 2.5
Sort library by kind • Set default note font • Improved Share sheet • "From" • attribution line for dragged-in browser text • Right-click menu bar icon menu • Storing source URL for dragged-in images and files • Bookmarklet PDF title and author fields • Search partial word support • Auto convert imported text files into notes • Right-click in library and choose to create a new note using the selected note as a template.
Version 2.0
New library view with browsing, searching, sorting, note editing • User-defined collections • Convert file to note.
Version 1.1
Preferences window and global keyboard shortcut • Bookmarklet now stores PDF of website • Fixed El Capitan rendering issues.
Version 1.0
Note window • Drag-and-drop to icon • Integration with Curio via Local • macOS Services • macOS Share • Save PDF • Browser bookmarklet • AppleScript.
Acknowledgements
Portions of Curiota may utilize the following copyrighted material, the use of which is hereby acknowledged.
MASShortcut - Copyright © 2012-2013, Vadim Shpakovski. All rights reserved. Source code. License.
1. Redistributions of source code must retain the above copyright notice, this list of conditions and the following disclaimer.
2. Redistributions in binary form must reproduce the above copyright notice, this list of conditions and the following disclaimer in the documentation and/or other materials provided with the distribution.
THIS SOFTWARE IS PROVIDED BY THE COPYRIGHT HOLDERS AND CONTRIBUTORS "AS IS" AND ANY EXPRESS OR IMPLIED WARRANTIES, INCLUDING, BUT NOT LIMITED TO, THE IMPLIED WARRANTIES OF MERCHANTABILITY AND FITNESS FOR A PARTICULAR PURPOSE ARE DISCLAIMED. IN NO EVENT SHALL THE COPYRIGHT OWNER OR CONTRIBUTORS BE LIABLE FOR ANY DIRECT, INDIRECT, INCIDENTAL, SPECIAL, EXEMPLARY, OR CONSEQUENTIAL DAMAGES (INCLUDING, BUT NOT LIMITED TO, PROCUREMENT OF SUBSTITUTE GOODS OR SERVICES; LOSS OF USE, DATA, OR PROFITS; OR BUSINESS INTERRUPTION) HOWEVER CAUSED AND ON ANY THEORY OF LIABILITY, WHETHER IN CONTRACT, STRICT LIABILITY, OR TORT (INCLUDING NEGLIGENCE OR OTHERWISE) ARISING IN ANY WAY OUT OF THE USE OF THIS SOFTWARE, EVEN IF ADVISED OF THE POSSIBILITY OF SUCH DAMAGE.


